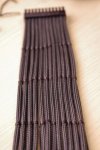
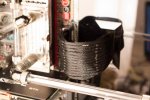
Tutorial voor het naaien van de kabels.
Het zijn ongeveer 16 foto's met tekst erbij.
Eindelijk gaat het maken hiervan stukken beter.
Ik ga het niet vertalen maar jullie komen er wel uit denk ik.
http://www.overclock.net/t/1334854/tath-caselabs-th-10-pedestal-hill-7-9/1760
Na het wegknippen van de bovenste horizontale draad blijft alles netjes op zijn plaats
http://www.overclock.net/t/1334854/tath-caselabs-th-10-pedestal-hill-7-9/1780
om je maar ff te helpen

Sewing tutorial or "This is how i did it".
First of all what do whe need or what did i use.
Tread whe call it "iron tread" thin and strong.
What tools do whe need "yes oke did i use:
- cut down paperclip to pull tru the tread;
- ruler to measure the tread;
- sharp knife to cut the wire.
Step 1:
Measure out 40 cm off tread "why 40 cm \ because shorter pieces i can not hold in my thick fingers".
Do i use the complete tread NO.
Step 2:
- fold the tread back "now you see why i can not hold it".
Step 3:
- left hand two fingers holding the loose ends of the tread;
- right hand stick tru thum and finger tru the loop "Easy you can do it".
Step 4.
- left hand still holding the wire "i say hold"
- right hand just flip your thumb and finger downwards (al fingers together please).
Step 5.
- now move your fingers "that are in the loo" to each other "contact yes ! oke".
- now holds your fingers in.
Step 6.
- attack your wire from underneath "or behind "
- as you can see the loop is at the right and;
- left hand holding both ends of the tread.
Step 7.
- push tru the loos end tru the loop at the right side.
Step 8.
- Pull up the loos end "not to hard". It is not your wife.
step 9.
- make a simple knot at pull the wire until you feel it is tight enough.
You can controling this by looking "the tread must NOT go diep in the sleeving"
step 10.
- left hand fingers hold end of tread;
- right hand fingers holding the two wires that are above each other in position.
Step 11.
- left hand fingers pulling the knot down "under the bottom wire"
- right hand hold the wire in position.
step 12.
- left hand holds the wire in position;
- right hand making tree rows around the wire "make shure to leave not a open gap between the rown"
Step 13.
- whe end the third row at the bottom and holding a finger under it so the tread stay in place;
- now whe push tru the paperclip "yes yes i explain it to you"
- now put ONE piece of the tread tru the paperclip
Step 14.
- pull the paperclip back and pull the wire tight down "until it get stuck" (i wont move without toutching it)
step 15.
- puth the paperclip now tru the wire at the lower side and put the tread in the paperclip
- pull back the paperclip "this time move the wire upwards until it stuck"
- make a simple knot at the left side of the wire (this you do until you get to the last (left) wire.
Now you are able to do this with all your cables "FINISHED NO".
By doing it my way you are able to adjust the position of the rows of tread by pushing it slidely up and down.
Step 16. (NOW WHE ARE GOING TO CONNECT ALL THE WIRE TO EACH OTHER"
- last wire is finish (from this one you DONT cut off the ends);
- push tru the paperclip again (tru the four wires) and put in ONE end of the loos end of the tread;
- pull the paperclip back until the wire is stuck again;
- now put in the paperclip again and pull tru the other wire (from the bottom side this time)
DO THIS PULLING TRU 3 TIMES "You will notice all the wires are connectid to each other"
DONT PULL TO HARD.
This is my result. Mayby i can do better but at the moment it works for me.
I hope some one is going to try out this tutorial.
So now im downstais getting my second cup of coffee and then back upstairs working on the six pin cable. pfffffff

[/quote][quote name="TATH" url="/t/1334854/tath-caselabs-th-10-pedestal-hill-7-9/1750_50#post_21852736"]The last pictures for today.
Finaly found a way (easy) to sew my cables.
Now i have to redo my other cable wat took me more then a few hours to make. I think that avery row cost me about 5 minutes.
Easy to do. You can do it too if you want.


